
WordPress to Next.js Migration: A Step-by-Step Guide Without Losing Rankings
WordPress powers a huge share of the web, and for good reason: it is familiar, flexible and cheap to start. But many business websites outgrow it. Pages get slower as plugins pile up, updates break things, and security patches never stop. That is why more and more teams are moving their sites to Next.js.
This guide explains when a move makes sense, how to migrate without losing Google rankings, and what we learned moving our own website, digitocrate.com, from WordPress to Next.js in November 2026.
Quick answer: should you migrate?
Migrate to Next.js if your site is mainly content and services — a law firm, consultancy, clinic, agency or publisher — and speed, security and SEO drive your enquiries. Stay on a well-optimised WordPress site if your team edits pages every day and depends on many plugins, such as a large WooCommerce store with complex add-ons.
What you gain by moving from WordPress to Next.js
- Speed. Next.js can build pages ahead of time and serve them from a global edge network. There is no database query and no PHP on each visit, so pages appear quickly, even on slow phones.
- Security. A statically built site has no login page, no plugins and no database exposed to the internet. Most of the attacks aimed at WordPress simply have nothing to hit.
- Less maintenance. No plugin updates, no theme conflicts and no PHP version upgrades. The site keeps working while you focus on clients.
- Cleaner SEO. You control every byte of HTML: titles, canonical tags, structured data and internal links, with no page builder adding thousands of lines of markup.
- Predictable hosting. Platforms such as Vercel host static and server-rendered Next.js pages on a global network, often at a lower cost than a busy WordPress server.
Our real results: digitocrate.com before and after
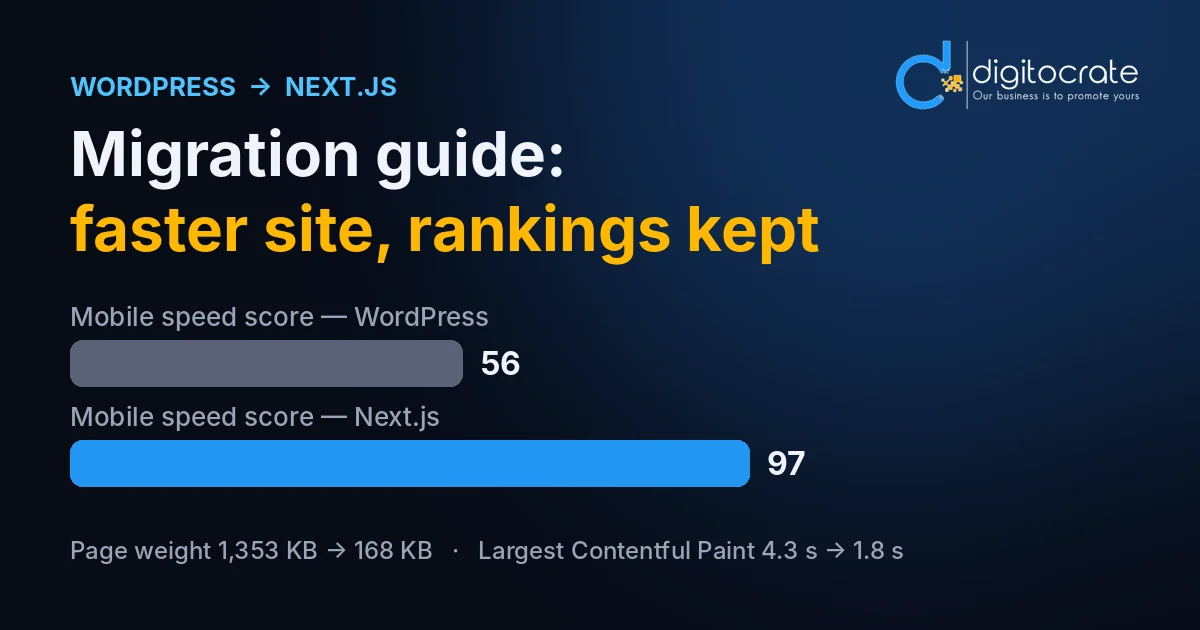
We measured the old WordPress homepage and the new Next.js homepage with Google Lighthouse on a simulated mobile phone, on the same day:
| Metric (mobile) | WordPress (before) | Next.js (after) |
|---|---|---|
| Lighthouse performance score | 56 / 100 | 97 / 100 |
| First Contentful Paint | 3.5 s | 0.8 s |
| Largest Contentful Paint | 4.3 s | 1.8 s |
| Cumulative Layout Shift | 0.304 | 0 |
| Total page weight | 1,353 KB | 168 KB |
The new page is about eight times lighter and content appears more than twice as fast. Just as important, all 66 old addresses we tested — pages, posts, categories and feeds — still open the right content on the new site.
Step 1: Audit the WordPress site before you touch anything
A safe migration starts with a complete list of what exists today.
- List every URL. Export pages, posts, categories and tags from the WordPress REST API (
/wp-json/wp/v2/postsand/pages) or crawl the site with an SEO crawler. - Find the pages that matter. In Google Search Console, export pages with clicks and impressions for the last 6–12 months. These pages must keep their address or get a careful redirect.
- Record the SEO details. For each page, save the title tag, meta description, canonical URL, Open Graph image and any structured data.
- Look for leftovers. Themes often leave demo pages behind. On our own site we found a fake "team" page with stock names, a pricing page full of placeholder text and a privacy policy that belonged to another company. A migration is the right moment to remove them.
Step 2: Decide the URL plan and redirects
The single most important rule: keep URLs the same wherever you can. If a post lives at /link-building/ today, it should live at /link-building/ tomorrow, with the same trailing slash.
For anything that changes or disappears, add a permanent (301 or 308) redirect to the closest matching page — not everything to the homepage. Typical WordPress redirects include:
- Category, tag and author archives → the blog or a relevant service page
- Feeds such as
/feed/and/post-name/feed/→ the blog or the post itself - Old sitemaps such as
/sitemap_index.xmland/wp-sitemap.xml→ the new/sitemap.xml - Merged or retired service pages → the new page that replaces them
In Next.js, redirects live in next.config.js (or next.config.mjs), so they are version-controlled and easy to review.
Step 3: Export and clean the content
The WordPress REST API returns each post's title, date, excerpt and rendered HTML. Page builders such as Elementor wrap content in many layers of markup, so we clean it before importing:
- Keep only meaningful HTML: headings, paragraphs, lists, links, images, tables and quotes.
- Remove scripts, inline styles, empty elements and page-builder wrappers.
- Rewrite absolute links (
https://example.com/page/) to relative ones (/page/). - Download the images that are actually used and keep them at their original paths, so old image links from other websites keep working.
- Create lighter WebP copies of large images for the pages themselves.
Step 4: Rebuild the site in Next.js
With the App Router, each migrated post can be generated at build time from your content using generateStaticParams, and each page gets its own metadata through generateMetadata. Key decisions:
- Rendering. Static generation suits most business sites. Use incremental regeneration or server rendering only where content changes constantly.
- Editing. Your team can keep WordPress as a "headless" editor, use a headless CMS, or edit Markdown and JSON files in a Git repository. Choose based on who edits and how often.
- Forms, search and comments. Replace plugin features with simple alternatives: a form service or API route, a lightweight search, WhatsApp and email links.
- Design. Either refresh the design or reproduce the current look faithfully. A fresh design is often worth it, but it is not required for a successful migration.
Step 5: Check SEO parity before launch
Before switching the domain, compare the new site with the old one on a private preview link:
- Every important URL returns 200, or a single 301/308 to the right page — no redirect chains.
- Titles, meta descriptions and canonical tags match or improve on the old ones.
- Structured data is present: Organization or LocalBusiness, BlogPosting for articles, BreadcrumbList and FAQPage where relevant.
- An XML sitemap lists every page you want indexed, and
robots.txtallows crawling. - Internal links point to final URLs, not to old addresses that redirect.
- Images have alt text, width and height, and pages pass Core Web Vitals on mobile.
We also crawl the preview to catch broken internal links. On our site this found one post that linked to an old slug, which we fixed with a redirect before launch.
Step 6: Launch day
- Lower the DNS TTL (for example to 300 seconds) a day before, so changes spread quickly and can be reversed quickly.
- Point the domain to the new host: usually an A record for the root domain and a CNAME for
www. - Remove old AAAA (IPv6) records. If an old IPv6 address stays in place, some visitors keep reaching the old server, and the new host may struggle to issue an SSL certificate.
- Leave email records alone. MX, SPF, DKIM and DMARC records are for email and must not change.
- Keep the old WordPress site on its server as a backup until you are sure everything works.
Step 7: After launch
- Submit the new sitemap in Google Search Console.
- Watch the Pages report and 404 errors for the first few weeks, and add redirects for any old URL that still gets visits.
- Re-test speed with Lighthouse or PageSpeed Insights and compare with your "before" numbers.
- Update your Google Business Profile and social profiles if any links changed.
Common mistakes to avoid
- Redirecting every old URL to the homepage. Google treats this like a missing page.
- Changing URL structure and design and content all at once without tracking what changed.
- Forgetting trailing slashes, which can create duplicate URLs.
- Leaving demo content, placeholder text or another company's legal pages on the new site.
- Deleting the old site before checking Search Console after launch.
Frequently asked questions
Will my Google rankings drop after moving to Next.js?
Not if URLs, content and SEO tags are kept the same and every changed address is redirected. Small fluctuations for a few days are normal while Google re-crawls the site.
How long does a migration take?
A typical service website of 20–100 pages takes two to four weeks from audit to launch. Larger sites are migrated in phases.
Can I still edit my website after the move?
Yes. You can keep WordPress as a headless editor, connect a headless CMS, or edit content files directly. The right choice depends on who edits the site and how often.
Is Next.js only for big companies?
No. Small business websites often benefit the most, because they get speed and security without paying for plugins, premium hosting or constant maintenance.
Want us to migrate your site?
We migrate WordPress websites to Next.js with every URL kept or redirected, SEO carried over and a private preview before launch. Ask for a free audit and we will show you how fast your site could be, or read more about our WordPress to Next.js migration service.